Chatbot with user-contextual search using Azure OpenAI and other Azure services

Contextual user search is a feature that enables chatbots to provide more accurate and relevant responses based on the user’s input and the available data. This can enhance the user satisfaction, trust, and loyalty, as well as the chatbot’s performance and efficiency. However, implementing contextual user search in a chatbot requires access to powerful and scalable AI models and services that can handle large and diverse data sources, and generate natural and coherent responses. One of the challenges of contextual user search is to ensure that the chatbot only returns responses from the documents that belong to the user who initiated the search request, and not from other users’ data. This can protect the user’s privacy and security, as well as the chatbot’s credibility and reliability. 

In this blog, I will show you how to implement a user-contextual search in a chatbot. This feature allows the chatbot to search content based on the logged in user.

Use Case

The actual use case is to provide a contextual searching experience to a logged in user based on the UPN (User Principal Name). Users in an organization have different documents assigned to them, such as reports, presentations, invoices, etc. This chatbot helps the users to search content using natural language from their set of documents. For example, a user can ask the chatbot “how to use Dapr pub/sub building block” and the chatbot will return the most relevant result from the user’s own Dapr guide, without searching other users’ data. This way, the chatbot can provide personalized and efficient responses to the user’s queries, while respecting the user’s privacy and security.

Note
There is a sample project available under the Azure Samples which I customized to build this use case to search content based on UPN. You can access the updated source code from ovaismehboob/azure-openai-chatbot (github.com)
and follow the sections below to provision resources, index documents, configure authentication, and run the application.

High-level Architecture

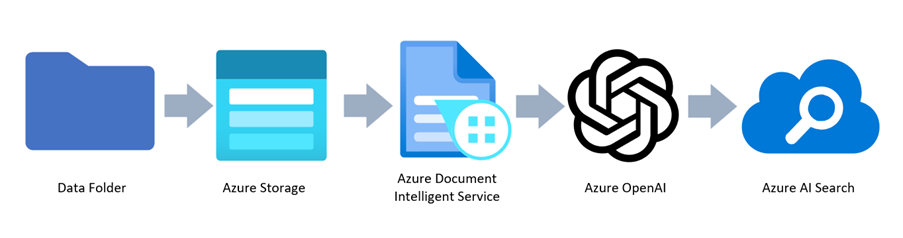
The high-level architecture of the solution is as follows:

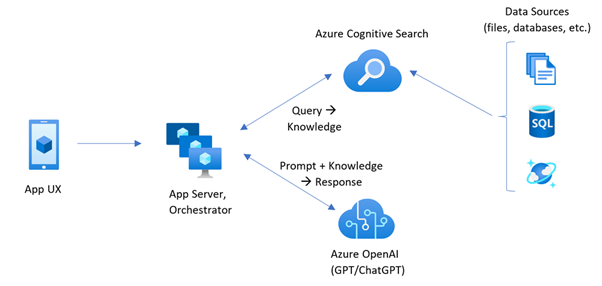
The architecture consists of the following components:

  • App UX: This is a SPA (Single Page Application) developed in React that lets the user to sign in and offer a textbox to search for content in natural language.
  • App Server: This is a backend service developed in Python that handles the user’s query and uses the search index to query the Azure AI Search for the relevant documents based on the user’s query and UPN. The search results are then sent to the Azure OpenAI to get the final response.
  • Azure OpenAI Service: provides REST API access to OpenAI’s powerful language models including the GPT-4, GPT-4 Turbo with Vision, GPT-3.5-Turbo, and Embeddings model series. In addition, the new GPT-4 and GPT-3.5-Turbo model series have now reached general availability. These models can be easily adapted to your specific task including but not limited to content generation, summarization, image understanding, semantic search, and natural language to code translation. Users can access the service through REST APIs, Python SDK, or our web-based interface in the Azure OpenAI Studio.
  • Azure AI Search (Azure Cognitive Search): is an AI-powered information retrieval platform, helps developers build rich search experiences and generative AI apps that combine large language models with enterprise data. It provides a rich indexing pipeline with integrated data chunking and vectorization, lexical analysis for text, and optional AI enrichment for content extraction and transformation. It also supports vector search, semantic search, hybrid search, and conversational search.
  • Azure Document Intelligence: is an AI service that applies advanced machine learning to extract text, key-value pairs, tables, and structures from documents automatically and accurately. Turn documents into usable data and shift your focus to acting on information rather than compiling it. This is used when you index documents.
  • Azure Storage: is Microsoft’s cloud storage solution for modern data storage scenarios. Azure Storage offers highly available, massively scalable, durable, and secure storage for a variety of data objects in the cloud. This is used to store documents needed to be indexed.

Provision Resources

To provision all the resources, check the Project setup section on GitHub repo. It uses azd CLI to spin up resources.

Index Documents

To index documents, I created a sub folder inside a data folder for each user’s UPN as shown below. Each sub folder contains the documents that belong to that user.

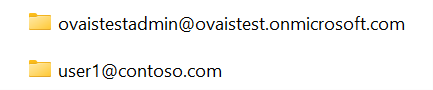
Each folder is named according to the UPN. To index documents, you need to run the script /scripts/prepdocs.ps1 {userUPN} where {userUPN} is a parameter you need to pass while running this script. Once you clone the repo (https://github.com/ovaismehboob/azure-openai-chatbot) you can run this script as shown below from the root folder.

./scripts/prepdocs.ps1 user1@contoso.com

You need to run this for each user to index their documents. The indexing process is explained in the section below:

There is a sub folder for each user’s UPN in the data folder that contains documents. The script requires a UPN as a parameter. It searches for the folder with the same name as the UPN in the data folder and upload all the documents to Azure storage. Azure Document Intelligent Service then extracts the data from those documents and passes it to Azure OpenAI to compute embeddings. When the embeddings are return, it stores the text and embeddings with a UPN for indexing.

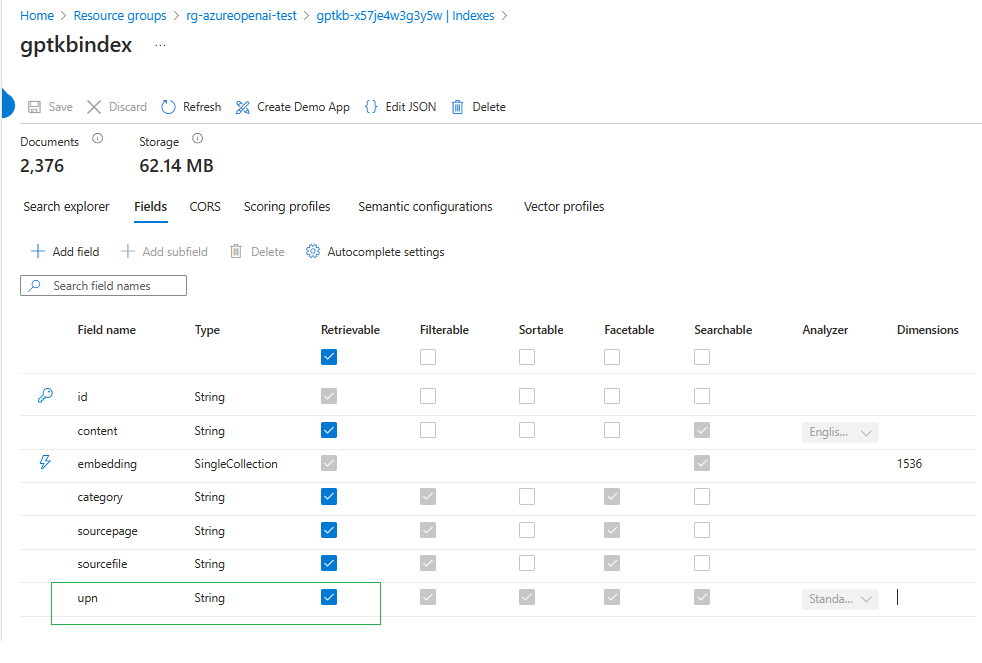
On the Azure AI Search, you need to add an additional field of UPN as shown below:

Enable Authentication using Microsoft Entra ID

You need to register server and client applications in Microsoft Entra ID to enable user authentication in the application. Check the below link to register and enable authentication:

azure-openai-chatbot/LoginAndAclSetup.md at main · ovaismehboob/azure-openai-chatbot (github.com)

Run Application

After you complete this setup, you can run the application. Go to the /app folder and run ./Script.ps1. This will start both frontend and backend applications. The application will be accessible from http://localhost:50505  

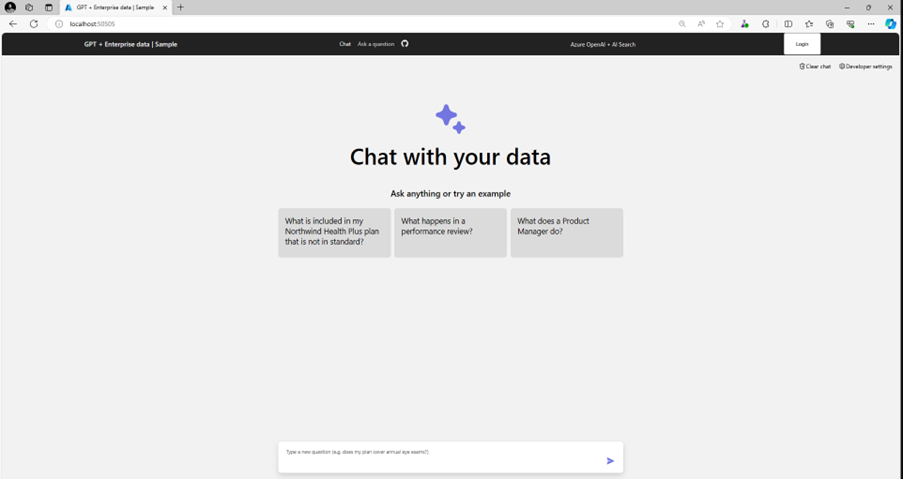
Login to the application by entering your Microsoft Entra ID credentials. You can ask questions related to your documents and it will bring you the results as shown below:

Hope this helps!

Containerize .NET Core App and Deploy to K8s with NGINX Ingress Controller as NLB

Kubernetes is one of the widely adopted platform today for orchestrating your container workloads. There are various approaches when it comes to deploy your containers to Kubernetes. In this blog post, we will cover step by step information of building and containerizing a simple ASP.NET Core application and deploy to Azure Kubernetes Services with Nginx Controller as a front end.

Following is the solution architecture that shows various components inside AKS. The consumer application communicates to the Nginx Ingress Controller which redirects the traffic to the K8s services resource and then to the container running inside a K8s pod.

image

Pre-requisites:

Following are the pre-requisites needed to be setup/installed before starting the implementation:

– VS Code

– Docker extension for VS Code

– Active Azure subscription

– AKS (Azure Kubernetes Services) provisioned

– ACR (Azure Container Registry) provisioned

– Helm charts

– kubectl

– Azure CLI

Once the pre-requisites are setup, lets proceed with the step-by-step tutorial to containerize and deploy the ASP.NET Core application in AKS.

Create a new ASP.NET MVC application

To create a new ASP.NET Core application, open the command prompt and use the dotnet CLI as shown below:

dotnet new mvc

Running the above command will create the ASP.NET MVC project and restore the NuGet packages.

clip_image004

Create a Dockerfile

Open this app in VS Code, and create a new Dockerfile by using the Docker extension. You can hit Ctrl+Shift+P and search for Docker: Add Docker Files to Workspace… option.

clip_image006

Select .NET: ASP.NET Core

clip_image008

Select Linux

clip_image010

Enter port 80

clip_image012

Finally, it creates a Dockerfile as shown below:

clip_image014

Build and Run the Docker image

To build a docker image, go to the folder where Dockerfile is resided, and execute the following command:

docker build -t nginxdemoapp:1.0 .

Once the image is built, run the application through docker run.

Docker run -d -p 6778:80 nginxdemoapp:1.0

This will spin up the container and you can access it from http://localhost:6778

Push to ACR

To push this image to ACR, we need to first tag it. Tag the image with the ACR repository, in my case it is mycontainerregistry.azurecr.io. Tag the image by running following command:

docker tag nginxdemoapp:1.0 mycontainerregistry.azurecr.io/nginxdemoapp:1.0

Once the image is tagged, Login to ACR using az CLI.

az acr login

Now push it by running the following command:

docker push mycontainerregistry.azurecr.io/nginxdemoapp:1.0

Once the image is pushed, you can also verify by going to Azure portal and seeing that image listed under Repositories.

Create a Deployment resource in AKS

We will first create a deployment resource object in K8s using the YAML file. Here is the k8sdeployment.yaml file that creates a deployment object inside K8s.

apiVersion: apps/v1

kind: Deployment

metadata:

name: nginxdemoapp

spec:

replicas: 2

selector:

matchLabels:

app: jos

component: nginxdemoapp

template:

metadata:

labels:

app: jos

component: nginxdemoapp

spec:

containers:

image: “mycontainerregistry.azurecr.io/nginxdemoapp:1.0”

name: nginxdemoapp

ports:

containerPort: 80

imagePullSecrets:

– name: mycontainerregistry

The mycontainerregistry is the secret that allows K8s to pull image from ACR. You can create the secret by running the following command:

kubectl create secret docker-registry mycontainerregistry –docker-server=mycontainerregistry.azurecr.io –docker-email=youremail –docker-username=mycontainerregistry –docker-password=yourpassword

To create the deployment, run the kubectl apply command as shown below:

kubectl apply -f k8sdeployment.yaml

Once the deployment is created, verify that 2 pods will be running by executing the kubectl get pods command

Deploy a K8s Ingress Controller

A Kubernetes ingress controller acts as a layer 7 load balancer. For Kubernetes services, these features include reverse proxy, configurable traffic routing, and TLS termination. The ingress controller is installed and configured to take the place of the load balancer.

To start with, lets first create a separate namespace as shown below:

kubectl create namespace ingress

Then, add the ingress-nginx repository in Helm

helm repo add ingress-nginx https://kubernetes.github.io/ingress-nginx

Update the repository by executing helm update

Next, install the NGINX ingress controller. We set the replicaCount to 2 to install two ingress controllers for redundancy.

helm install nginx-ingress ingress-nginx/ingress-nginx –namespace ingress –set controller.replicaCount=2 –set controller.nodeSelector.”beta\.kubernetes\.io/os”=linux –set defaultBackend.nodeSelector.”beta\.kubernetes\.io/os”=linux

After running the above command, ensure the ingress controller service is running

Kubectl get services –namespace ingress

Create a Service resource in AKS

We will create a service file named K8sservice.yaml to create a K8s service object for our .NET Core app and set its type as ClusterIP so it can be accessible only within the K8s cluster itself.

apiVersion: v1

kind: Service

metadata:

labels:

app: jos

name: nginxdemoapp

spec:

ports:

– port: 80

targetPort: 80

protocol: TCP

type: ClusterIP

selector:

app: jos

component: nginxdemoapp

Create the service by running the command below:

kubectl apply -f K8sservice.yaml

Verify the service is created by executing the following:

kubectl get services

Create an Ingress resource in AKS

We create a ingress resource which allows to access the service using Ingress controller. Create a new K8sIngress.yaml file and add following code.

apiVersion: networking.k8s.io/v1beta1

kind: Ingress

metadata:

name: nginxdemoapp-web-ingress

annotations:

kubernetes.io/ingress.class: nginx

spec:

rules:

– host: frontend.{IngressControllerIP}.nip.io

http:

paths:

– backend:

serviceName: nginxdemoapp

servicePort: 80

path: /

Change the IP {IngressControllerIP} with your nginx-ingress-ingress-nginx-controller external IP address and run the kubectl apply command to create this resource.

kubectl apply -f K8sIngress.yaml

Verify the resource is created by running

kubectl get ingress

Finally test the application by going to the http://frontend… URL.

clip_image016

Hope this helps!

Setting up Kafka in Azure Event Hubs and establishing a distributed messaging system between Java and .NET Core applications

In this post, I will share the steps to set up Kafka using Azure Event Hubs and produce messages from a Java Spring Boot application, while .NET Core application will be used as a consumer.

There are various options available in Azure Marketplace to setup Kafka, for example, Kafka cluster is available from Bitnami, Azure HDInsight, Event Hubs and so on. In this post, we will be using Event Hubs for Apache Kafka protocol.

Azure Event Hubs Kafka endpoint enables developers to connect to Azure Event Hub using Kafka protocol. It is a fully managed service in the cloud, very easy to set up, the endpoint is accessible over the internet. The infrastructure is completely managed and you just need to focus on building your application rather setting up or managing the infrastructure components. Another advantage is that the integration with existing client applications using Kafka protocol is seamless. Just need to provide the new configuration values and you are good to use the Kafka endpoint in minutes.

Setting up Event Hub for Kafka endpoint 

Event hub for Kafka protocol can easily be set up by creating a new resource in Azure and search for Event Hubs.

image

One thing to note while provisioning this resource is to check “Enable Kafka” as shown below.

image

Once the Kafka namespace is created we can add topics. Topics can be created by selecting the Event Hubs option under Entities and click on +EventHub option.

image

Once the topic is created, we can start producing messages into that topic and consume them

Setting up Producer: Adding Kafka support in Java application

We will first add the dependencies required to use Kafka in Java application.  In our case, I have a web API built on Java Spring Boot framework that exposes an endpoint. Once the user hit particular endpoint, I want to read a certain value and push it to the Kafka topic.

To add Kafka support, edit pom.xml file and add the following dependency

<dependency>
<groupId>org.apache.kafka</groupId>
<artifactId>kafka-clients</artifactId>
<version>0.11.0.0</version>
</dependency>

Now, we will create the producer.config file and add connection string, Kafka server endpoint etc. Here is the configuration for the producer.config file. Add this file under /src/main/resources folder.

bootstrap.servers= {serverendpoint}:9093
security.protocol=SASL_SSL
sasl.mechanism=PLAIN
sasl.jaas.config=org.apache.kafka.common.security.plain.PlainLoginModule required username=”$ConnectionString” password=”{password}”;

To obtain {serverendpoint} and {password} values, go to Event Hub and click on Shared access policies tab. Click the policy and copy the Connection string-primary key value. This whole value is the password. You can then extract the server endpoint from the same value and provide it for the bootstrap.servers key. It should be something like {youreventhubnamespace}.servicebus.windows.net

Now, we can add the following code snippet to send messages to Kafka and use the configuration values from the producer.config file.

Properties properties = new Properties();

properties.load(new FileReader(“src/main/resources/producer.config”));

properties.put(ProducerConfig.KEY_SERIALIZER_CLASS_CONFIG,

LongSerializer.class.getName());

properties.put(ProducerConfig.VALUE_SERIALIZER_CLASS_CONFIG, StringSerializer.class.getName());

KafkaProducer<Long, String> producer = new KafkaProducer<>(properties);

long time = System.currentTimeMillis();

final ProducerRecord<Long, String> record = new ProducerRecord<Long, String>(“bidtopic”,time,”This is a test message”);

producer.send(record, new Callback() {

public void onCompletion(RecordMetadata metadata, Exception exception) {

if (exception != null) {

System.out.println(exception);

System.exit(1);

}

}

});

}

catch (Exception ex)

{

System.out.print(ex.getMessage());

}


The above code is initializing KafkaProducer object by passing the producer config properties and then sending a message using a producer.send method and passing ProducerRecord object.

Setting up Consumer: Adding Kafka support in .NET Core application

To add Kafka support in the .NET Core application, there are many Kafka libraries available. For this sample, I have used the Confluent Kafka library that can be added as a NuGet package.

Open NuGet manager and add Confluent Kafka library as shown below

image

Create a class and add ConsumeMessages method to receive messages from the topic.

public void ConsumeMessages(string topic)
{

var config = new ConsumerConfig
{
GroupId = “onlineauctiongroup”,
BootstrapServers = “{serverendpoint}:9093”,
SaslUsername = “$ConnectionString”,
SaslPassword = “{password}”,
SecurityProtocol = SecurityProtocol.SaslSsl,
SaslMechanism = SaslMechanism.Plain,
Debug = “security,broker,protocol”
};

using (var consumer = new ConsumerBuilder<Ignore, string>(config).Build())
{
consumer.Subscribe(topic);

CancellationTokenSource cts = new CancellationTokenSource();
Console.CancelKeyPress += (_, e) => {
e.Cancel = true; // prevent the process from terminating.
cts.Cancel();
};
try
{
while (true)
{
try
{
var cr = consumer.Consume(cts.Token);
Console.WriteLine($”Consumed message ‘{cr.Value}’ at: ‘{cr.TopicPartitionOffset}’.”);
}
catch (ConsumeException e)
{
Console.WriteLine($”Error occured: {e.Error.Reason}”);
}
}
}
catch (OperationCanceledException)
{
// Ensure the consumer leaves the group cleanly and final offsets are committed.
consumer.Close();
}
}

}

In the above code, ConsumerConfig is used to specify the Kafka specific configuration values. ConsumerBuilder to build the consumer object by passing the ConsumerConfig object. We can listen to specific topics by calling the consumer.subscribe method and finally consume messages using the Consume method.

Hope this helps!

Configure Docker for Node.JS API and deploy it on AKS

In this post, we will configure docker and host Node.JS API locally and then deploy it to the Azure Kubernetes Services.

To start with docker, we need to first install it. We can install docker from the following link https://docs.docker.com/docker-for-windows/install/

Once the docker is installed, we can verify the version by running the following command from Powershell

> docker –-version

image

Configure Docker in Node.js API project

I am assuming you are using the VS Code for Node.JS API. So first open the Node.JS API project in VS Code and add the docker extension as shown below.

image

Once this is installed we will add the Dockerfile into the project and add the following script

image

The above code downloads the docker image from the dockerhub.io registry. It sets the working directory as /src and copies all files into it. The port that we will be using is 3000 and CMD is the command which will be executed to run this API.

Next, add the .dockerignore file to exclude the files we needed not to be copied in the container directory. Here is the screenshot of .dockerignore file.

image

Build Docker Image

To build the docker image, go to the directory where the Dockerfile resides and run the following command

> docker build –t  <username>/<servicename>

Replace <username> with your user name it could be anything. For <servicename> add the name of the service. This will build the image and create it to the local registry.

Once this is run, execute the following command to see the docker image listed.

image

Run the Docker Image

Once the image is built and deployed to a local docker registry. We will just run it under the docker container by executing following command

> docker run –p 3000:3000 -d <username>/<servicename>

The –p flag redirects a public port to a private port inside the container. In our case, we are using the same port for both public and private ports.

You can run and test your application now and it should be working fine.

Create ACR in Azure

Now, since we need to deploy this to Azure using AKS (Azure Kubernetes Cluster) we will first create a registry and push this image over there. To create a registry we will use ACR (Azure Container Registry) service in Azure.

Provisioning ACR in Azure is simple. You just have to log in to Azure portal and create a new resource and choose ACR.

image

Hit create and enable Admin user.

image

Once it is created, go to the Settings section and click on Access Keys. We need to generate access keys so we can authenticate it while pushing the image to the ACR.

Push Docker Image To ACR

In order to push the docker image, we first need to tag the ACR image with a local docker registry. To do this, open PowerShell and execute the following command

> docker tag <localrepositoryname> <ACRURL>/<servicename>

for e.g.

docker tag ovaismehboob/auctionservice ovaismehboob.azurecr.io/auctionservice

Now, login to ACR registry using docker run as shown below

> docker run ovaismehboob.azurecr.io/auctionservice

It will ask admin user and password, copy it from the Access Keys section in ACR and use it to authenticate.

Once this is authenticated, we will push the image as shown below

docker push ovaismehboob.azurecr.io/auctionservice

Verify it from the ACR in Azure. It should be listed under the Repositories section.

Setup Azure Kubernetes Cluster in Azure

To create a new AKS cluster in Azure, click on create a resource in the Azure portal and search for Kubernetes service. Choose default values and provide values such as resource group, kubernetes cluster name,  region, etc.

Deploy Docker Image to AKS

First, we install the AKS CLI locally on our PC by running the following command.

> az aks install-cli

Next, we will create a secret that connects to the ACR and will be used by Kubernetes to pull the image from our ACR repository.

Run following to create a secret

kubectl create secret docker-registry <SECRET_NAME>
–docker-server=<REGISTRY_NAME>.azurecr.io
–docker-email=<YOUR_MAIL>
–docker-username=<SERVICE_PRINCIPAL_ID>
–docker-password=<YOUR_PASSWORD>

For e.g.

kubectl create secret docker-registry onlineauctionacr –docker-server= ovaismehboob.azurecr.io –docker-email=ovaismehboob@hotmail.com –docker-username=onlineauctionregistry –docker-password=CRj+++76yW5kAdEkrhJn4S4LNNRn+++

Now we need to deploy to Kubernetes, and for this, we create a YAML file and choose the kind as deployment. If you notice, the onlineauctionacr is the secret we have defined under imagePullSecrets section in below script.

apiVersion: apps/v1

kind: Deployment

metadata:
labels:
name: auctionservice

spec:
replicas: 3
selector:
matchLabels:
name: auctionservice
template:
metadata:
labels:
name: auctionservice
spec:
containers:
– image: ovaismehboob.azurecr.io/auctionservice
name: auctionservice
ports:
– containerPort: 3000
imagePullSecrets:
– name: onlineauctionacr

Save this file as .yaml extension and execute the following command to deploy it to Azure Kubernetes Cluster.

> kubectl apply –f <filename>.yaml

Once this is done, run the following command to see the deployment

> kubectl get deployments

image

Since we mentioned replicas value as 3, three pods will be created. We can verify it by running the following command

> kubectl get pods

image

Finally, we will expose this deployment as a service. To expose this as a service we will create another file having content as follows

apiVersion: v1

kind: Service

metadata:
name: auctionservice
labels:
name: auctionservice

spec:
ports:
– port: 3000
targetPort: 3000
protocol: TCP
type: LoadBalancer
selector:
name: auctionservice

Source port is 3000 and the target port is 3000. That means the external and internal port will be the same i.e. 3000.

Next, we need to run this command to expose this as a service that can be further used to access our API.

> kubectl apply servicefilename.yaml

We can verify the services are running through the following command

> kubectl get services

Above command list down the external IP address that we will use to access our API. In our case, it will be http://externalIPAddress:3000

Hope this helps!

Using Azure Media Services for on-demand video playback with a pre-roll advertisement

AMS (Azure Media Services) is a cloud based platform that enables on-demand and live streaming video solution for consumer and enterprise solutions. In this blog post we will upload a sample video in AMS Assets library and add a pre-roll advertisement using the sample advertisements.

AMS uses blob storage to store video content. The video file can be uploaded to the Azure portal from Assets library. Prior to this we should have an AMS setup on cloud. To setup Azure Media Services account on Azure, please refer following link: https://docs.microsoft.com/en-us/azure/media-services/previous/media-services-portal-create-account

Once the account is setup, go to the Azure Media Service resource and click on Assets. Assets is connected with the blob storage and whatever file is uploaded is stored in the respective blob storage associated with your AMS account.

Click on Upload and upload any video file.

image

Once the file is uploaded you can encode into different formats and publish.

During publishing, depending on the file encoding, you get an option to select the locator. There are two types of locators namely Progressive and Streaming. Progressive locator is just like downloading a video over HTTP where streaming locator is better for streaming video over different protocols. It provides a better client playback experience. With streaming locator there are different bitrates that you can choose from and the client can choose the one which is most appropriate as per their bandwidth. The lowest bitrate is 300 Kbps and the content is the video is downloaded in a chunk of size 300 KB per second.

Once the asset is published the streaming endpoint will be generated that can be use to test in AMP (Azure Media Player). Open the AMP from this link below:

http://ampdemo.azureedge.net/azuremediaplayer.html

Paste the streaming endpoint and hit Update Player to play your stream.

AMS player can be embedded onto a webpage in different ways. We can use the “Get Player Code” option and place the scripts and HTML as shown below.

Add scripts in the head section of your page

headsection

Add HTML 5 video control as shown below in the body

Finally add following script to initialize the Azure media player and set the player options. the src is the source of your streaming endpoint that you have provisioned on AMS

bodysection

In order to add advertisements we can modify the same script as shown above and use ampAds to define advertisements. AMP uses VAST ads to embed into pre-roll, mid-roll or post-roll options. VAST stands for Video Ad Serving Template. It is a popular industry standard to make video ad with pre-roll or post-roll ads. It is also very common across different services. To create VAST ads we can use platforms like OpenX or AdButler. I will not go into the details as this is off the topic for this post. However, we can use the sample VAST advertisements to test our stream. Let’s modify the script and add the ampAds into the AMP template.

Here is the updated body that plays the sample VAST ad before the video begins.

body

Hope this helps!

C# 7 and .NET Core 2.0 High Performance

I have recently published a book with Packt on C# and .NET Core titled as “C# 7.0 and .NET Core 2.0 High performance”. It is primarily targeted to the .NET developers and architects who wanted to develop higclip_image001hly performant applications and learn the best practices and techniques to write quality code, starting from the code conventions, project structure to data structures and design patterns. Using multithreading and asynchronous programming using threads and Task programming library. It covers a whole chapter on Microservices which is one of the most emerging architecture in the industry for developing independent, modular and scalable services that have lesser dependencies on other components and allows developers to choose the best technology for particular requirement. Security is very important for any application and there is a full chapter on security that highlights the options available in .NET Core with some examples to protect application and making it production ready by securing it at all layers. Lastly, discussed some techniques to measure application performance using tools like App Metrics and BenchmarkDotnet.

Here is the Amazon link to the book

Happy reading!

Implementing Mediator Pattern in .NET Core using MediatR

Mediator pattern is the event-driven pattern, where handlers are registered for specific event and when the event is triggered, event handlers are invoked and the underlying logic is executed. It is highly used with the Microservices architecture which is one of the most demanding architecture for large-scale enterprise applications these days. In this blog post, I will show the usage of mediator pattern and how we implement using the MediatR library in .NET Core.

What is Mediator Pattern

As per the definition mediator pattern defines an object that encapsulates the logic of how objects interact with each other. Generally, in business applications we have form  that contains some fields. For each action we call a controller to invoke the backend manager to execute particular logic. If any change is required in the underlying logic, same method needed to be modified. With mediator pattern, we can break this coupling and encapsulate the interaction between the objects by defining one or multiple handlers for each request in the system.

How to use MediatR in .NET Core

MediatR is the simple mediator pattern implementation library in .NET that provides support for request/response, commands, queries, notifications and so on.

To use MediatR we will simply add two packages namely MediatR and MediatR.Extensions.Microsoft.DependencyInjection into your ASP.NET Core project. Once these packages are added, we will simply add MediatR in our ConfigureServices method in Startup class as shown below

public void ConfigureServices(IServiceCollection services)
        {
            services.AddMediatR();
            services.AddMvc();
        }

MediatR provides two types of messages; one is of type Notification that just publishes the message executed by one or multiple handlers and the other one is the Request/Response that is only executed by one handler that returns the response of the type defined in the event.

Let’s create a notification event first that will execute multiple handlers when the event is invoked. Here is the simple LoggerNotification event that implements the INotification interface of MediatR library

public class LoggerEvent : INotification
    {
        public string _message;

        public LoggerEvent(string message)

        {
            _message = message;
        }
    }

And here are the three notification handlers used to log information into the database, filesystem and email.

Here is the sample implementation of DBNotificationHandler that implements the INotificationHandler of MediatR

public class DBNotificationHandler : INotificationHandler

    {
        public Task Handle(LoggerEvent notification, CancellationToken cancellationToken)

        {
            string message = notification._message;

            LogtoDB(message);

     return Task.FromResult(0);

        }

        private void LogtoDB(string message) => throw new NotImplementedException();

    }

Same goes with EmailNotificationHandler for email and FileNotificationHandler to log for file as shown below.

public class EmailNotificationHandler : INotificationHandler

    {

        public Task Handle(LoggerEvent notification, CancellationToken cancellationToken)
        {
            //send message in email

            string message = notification._message;

            SendEmail(message);

            return Task.FromResult(0);

        }
        private void SendEmail(string message) => throw new NotImplementedException();

    }


public class FileNotificationHandler : INotificationHandler

    {

        public Task Handle(LoggerEvent notification, CancellationToken cancellationToken)

        {

            string message = notification._message;

            WriteToFile(message);

            return Task.FromResult(0);

        }

        private void WriteToFile(string message) => throw new NotImplementedException();

    }


Finally, we can use MediatR in our MVC Controller and call publish as shown below. It will invoke all the handlers attached to the LoggerEvent and execute the underlying logic.

[Produces("application/json")]

    [Route("api/Person")]

    public class PersonController : Controller
    {
        private readonly IMediator _mediator;
        public PersonController(IMediator mediator)
        {
            this._mediator = mediator;
        }
        [HttpPost]
        public void SavePerson(Person person)
        {
            _mediator.Publish(new LoggerEvent($"Person Id={person.PersonId}, Name ={person.FirstName + person.LastName}, Email={person.Email}"));
        }
    }

In the next post, I will show a simple example of sending a Request/Response message using MediatR.

Hope this helps!

Angular Caching issue in IE for $http

In this blog post I wanted to share one problem that I faced while working on Angular 4 project. I was using Angular 4 as a client side framework and ASP.NET Core Web API for server side operations. The problem I faced was related to HTTP GET request, which was caching the request for approx. 1 minute during back and forth page navigation and skipping calling my Web API. I put browser console logging to know what is happening but the http.get() operation was not hitting my Web API. The strange thing that this was only happening with IE and other browsers which I tried like Chrome, Mozilla were working fine. As the data was real time, I don’t wanted HTTP operation to be cached and wanted to invoke my API on every navigation.

To resolve this error, I had to set few headers which resolved the caching problem and here is the code snippet showing how you can set headers like Cache-control, Expires and Pragma and pass it in the HTTP request.

export class DataComponent implements OnInit {
private httpObj: Http;    private headersAdditional: Headers;
constructor(http: Http) {
this.httpObj = http;

this.headersAdditional = new Headers();
this.headersAdditional.append(‘Cache-control’, ‘no-cache’);
this.headersAdditional.append(‘Cache-control’, ‘no-store’);
this.headersAdditional.append(‘Expires’, ‘0’);
this.headersAdditional.append(‘Pragma’, ‘no-cache’);
}

public ngOnInit(): any { this.LoadTables(); }

private LoadTables() {
      this.httpObj.get(‘/api/Data/GetData’, {headers: this.headersAdditional }).subscribe(
      result => { //do something with the response });
}

Hope this helps!

Mobile DevOps using VSTS, Xamarin Test Cloud and HockeyApp for Xamarin

In this post I will show how effectively we can use VSTS to provide build automation, release management for Xamarin Apps and use Xamarin Test Cloud and HockeyApp for application testing.

VSTS stands for Visual Studio Team Services, is a cloud service to leverage certain features like defining new projects, team structure, build management, release automation and others that can be used in each phase of the software development lifecycle. Every software lifecycle undergo several phases that includes planning, designing, development, testing and then deployment on production and VSTS provides several components that can be used to accelerate and automate tasks with the complete team management and reporting.

VSTS is an online version of TFS that can be accessed from http://visualstudio.com/vso and it provides a free account supported up to 5 members. With VSTS we can define team projects, select version control (Git or TFS), define team members, manage work items, define build definitions, release management and so on.

So let’s take a simple example of hosting our basic Xamarin app on VSTS and define build definitions and policies to build application on code check in and then pass through some steps to test on cloud and publish on HockeyApp

Creating Team Project

Login with your account on {accountname}.visualstudio.com and create a new Team Project by hitting New Project button as shown below. You can name it any, in my case I named it as MobileDevOps and selected Git as the version control. Once this project is created you can clone this repository in Visual Studio or use Git commands to push your Xamarin solution on cloud.

Once your project is checked in on VSTS you can view the files from Code tab as shown below

image

So now we can play with defining a build and enable continuous integration.

Setting up a Build Definition

We can create a new build definition by going to the Build & Release tab and click on Builds. This opens up a page from where we can create a new definition. When you hit new definition, it will ask to select any template from the existing ones or select empty to create your own.

We will select the Xamarin.Android as in this post we will cover the configuration related to Android. Go through the wizard and it generates the basic template containing few steps

image

I have modified and few steps and they were deprecated and below snapshot shows the final set of steps executed when the new build is queued.

image

First step talk about restoring NuGet packages and restore all the packages defined in the package.json file in your solution. The configuration for NuGet restore would be as follows

image

Second step is about building the Xamarin project. Project reference the path of our Xamarin Android project, Output directory is where the .apk file will be created. Create App Package needs to be checked. From MSBuild we can select the version and architecture for which we need to create a package for. From JDK Options we can select the specific JDK version

image

Third step is to copy the .keystore file to the binaries directory. This is required if we want to distribute our app to the HockeyApp store. We can create .keystore file by running a keytool command from the path where Java is installed.

Here is the command

C:\Program Files (x86)\Java\jdk1.8.0_112\bin>keytool -genkey -v -keystore “D:\Projects\Xamarin\myappkey.keystore” -sigalg SHA1withDSA -keyalg DSA -keysize 1024

Below snapshot shows the steps when command is executed and ask for the Password.

image

We also need to note down the KeyAlias to specify in HockeyApp site and that can be obtained by running following command.

C:\Program Files (x86)\Java\jdk1.8.0_112\bin>keytool -keystore “D:\Projects\Xamarin\myappkey.keystore” -list -v

image

So, once the keystore is generated you have to check-in that file on your source code repository on the root folder where .sln file resides and then configure the Copy files to build directory as shown below.

image

On fourth step, we have to sign our package with the keystore we have generated and specify the same Key Password provided during the generation of keystore and for Alias use the command above to obtain the alias name.

image

Next, for Build solution step which is the fifth step in our definition. We will specify the Test project path and MSBuild arguments to place the test binaries under test-assembly folder. To learn how to create unit testing project for Xamarin apps, check following link https://developer.xamarin.com/guides/ios/deployment,_testing,_and_metrics/touch.unit/

image

Sixth step is running the tests on cloud and here is the configuration for Xamarin Test Cloud

image

Team API key can be obtained from https://testcloud.xamarin.com/. Login to this website and go to Account Settings. Click on Teams & Apps and click on Show API Key

image

Then, you have to define a new test run for that particular Team and select Android

image

Select devices for which you want the tests to run

image

Complete the wizard and note the device ID as shown on the last page wizard, and then specify the device Id, API key and your email to which your account is registered in Xamarin Test Cloud on configuration page in VSTS.

image

Seventh step is about publishing results in an xml file executed by Xamarin Test Cloud.

image

And then finally on eighth step we will copy the tested package in our drop artifact

image

Please note: Xamarin Test Cloud needs a permission to access and execute test cases. So make sure that your Xamarin AndroidManifest.xml file must have following entry

<uses-permission android:name=”android.permission.INTERNET” />

To verify, lets run a build by hitting Queue new build and see if the build is succeeded.

Create Release Definition to distribute our App to HockeyApp users

To create a release definition, we will go to Build & releases > Releases and create a new definition.  Provide any name and then create a new Environment and add task HockeyApp as shown below

image

If HockeyApp task is not showing in your task list, then add the extension for VSTS from the VS Marketplace https://marketplace.visualstudio.com/items?itemName=ms.hockeyapp

And here is the HockeyApp configuraiton

image

So this create our release definition but it will not work until we associate our VSTS with HockeyApp. So we have to go to the website http://rink.hockeyapp.net  and then create an API token with full access. This API token can be created by going to the Account Settings> API Token as shown below.

image

Note the API Token and then create a new Service Endpoint from VSTS by going to the Services tab and choose HockeyApp as follows

image

Specify the connection name and the API token retrieved from HockeyApp website

image

once this is done we can install the hockey app on our android device from https://www.hockeyapp.net/apps/ as this is not available on store. We have to enable the “unknown sources” in our android device settings so HockeyApp app can be installed.

Once installed, you can sign in with your hockey account and download the app which will be pushed when the release definition will run.

Please note that the Continuous Integration (CI) can be enabled for particular build definition from Triggers tab and this runs everytime when the user check in any code. Moreover we can also enable the Continuous Deployment (CD) from release definition triggers tab which deploy the app on HockeyApp once the build is succeeded.


Hope this helps!


Targeting PCL to .NET Standard

Enterprise application architecture comprises of multiple layers and usually, each layer is representing a separate project. Each project could be a class library project, UWP project, web forms project or ASP.NET MVC project and so on. We usually have a core class library project which is shared across multiple layers and contains some backend and core functionality that every layer can use.

Each platform has a different app model and referencing .NET assembly is not possible until it is a PCL (Portable Class Library). Portable class libraries were used to address these type of scenarios where you can select the app models or platforms while creating a class library and then it can be added to the project to which that library supports.

With the release of .NET Core, Microsoft introduces the next generation of PCL known as .NET Standard. .NET Standard is a set of interfaces that is implemented by different platforms and each .NET Standard has a version number to which that platform supports. There are various versions of .NET Standards to which each platform implements.

Below table shows the .NET standard version and the platform supported.

image

These arrows specifies the supportability of the platform to a version of a .NET Standard. For example, .NET Core 1.0 supports version 1.6 and it can add any of the platform assemblies lower to that version. However, if we need to reference the .NET Core 1.0 assembly in any of the lower versions of .NET Standard, we need to degrade our .NET core assembly’s .NET standard to that version.

Microsoft is now shifting the .NET Core project extension from .xproj to .csproj. As it is still in the preview it is not recommended to use in production. However, today if you are using .NET Core 1.0.* in production and wanted to reference your .NET Core assembly in any of the other platforms you can use .NET Standard and use the version that supports other projects. However, due to the different project extension .xproj we cannot reference any .NET Core assembly in other platforms for example UWP project that has a .csproj project extension.

However, there is a way as shown in this post through which you can create a .NET Core project with a .csproj extension and then easily reference in other .NET project.

1. Create a Class Library (Portable) project

image

2, Select the Target platforms.

image

3. Once this project is created, open up the project properties and click on the “Target .NET Platform Standard” as shown below.

image

4. This will change the “Target” to .NET Standard version and selected the minimal version from the platforms selected.

image

5. Finally, you have an assembly which is a .NET Core 1.0 assembly and it can be added to any platform which supports particular .NET standard or lower version.

Hope this helps!